YAY! You’ve decided to make a budget and you have all the tools that you need in order to get started. All you need are some instructions on how to use it.
This post is going to outline how to use my free budgeting spreadsheet only. If you need to learn how to make a budget then read this post first. This spreadsheet works on the premise of a zero-based budget. If you don’t know what that is, you can read about it here.
Start with Income
Enter your take home pay in cell C4. The spreadsheet will automatically calculate your 70/30% split for you.
Enter your Recurring Bills
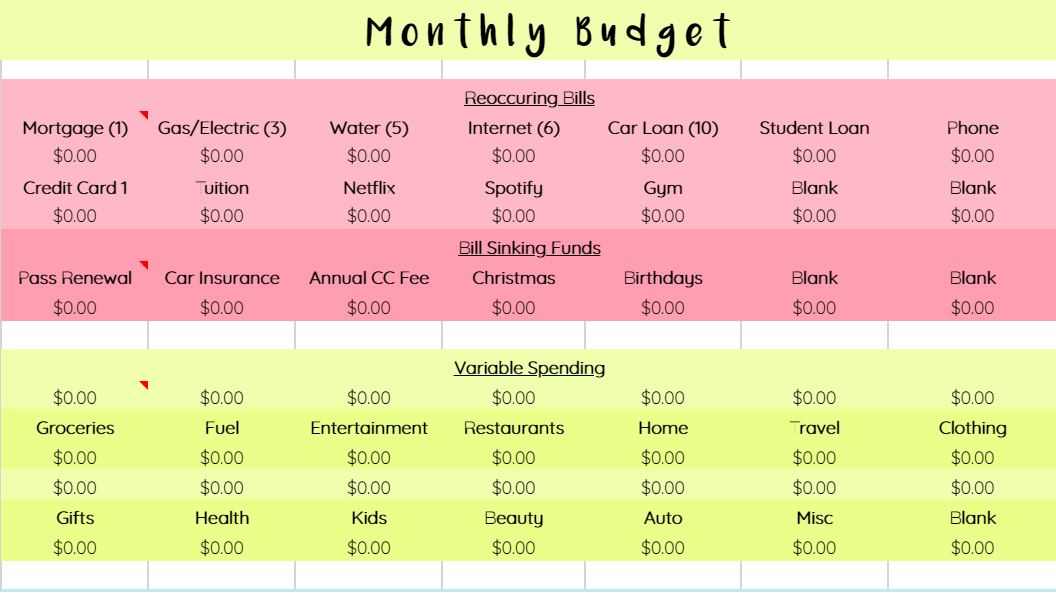
In the pink/red section at the top (cells E5 – K7), enter the amount of each recurring bill that you have. This section is editable, so you can delete an item if it does not pertain to you, add an item that is not listed, or move them around how you would like to arrange them.
In the parenthesis, write the due date of your bill so that you always have it handy.
Once you have finished, the total of this section will automatically be calculated for you in cell C8.
Create your Sinking Funds
The Sinking Fund section is used for bills that are only paid once or twice a year. You can use the sinking fund calculator (in cells C22 & C23)to determine the amount that should go in these boxes. Basically, a sinking fund is money that you set aside each month so that you have the total amount by the date you want to spend it. Again, you can adjust these categories to what you need them to be.
For example:
I want to put aside money for my $95 annual credit card fee so that I don’t have to come up with the whole sum the month it is due. Say it is due in 5 months. I would take $95/5 to get $19. So every month I would but away $19 so that by the time the bill comes due I will have $95 already saved.
Cell C9 will automatically total these numbers for you and then cell C10 will total your recurring bills with the sinking fund bills to give your total fixed expense amount for each month.
Enter your Variable Spending
Cell C12 will show you how much of your 70% budget you have left after fixed expenses to use for your variable spending. Above each category (cells E13-K13 & E16-K16), you will insert the amount your are going to budget that month. Cell C13 will show you the total amount you have budgeted for variable spending. You can see how much more you have left to budget, or if you’ve over budgeted by looking at cell C14. Your goal should be to get cell C14 to be zero.
Throughout the month, you will track your spending in the cells below the categories (cells E15-K15 & E18-K18. The first time you have an expense in a particular category begin with an = sign before you write the amount. Then for each subsequent expense add them with a + sign. This will automatically add the category total up for you.
You wan to make sure that the amount your are spending is equal to or less than the amount you have budgeted. If you overspend in one category on accident or by necessity, make sure you under-spend by that amount in a different category.
At the end of the month, the yellow/green box on the bottom of the right side bar will show you your actual spending and saving numbers for the month.
Allocate your Savings
If you have gone over 70% of your income with your fixed and variable spending, cell 16 will automatically pull money from your savings to allocate toward your bills. Cell C17 then is where you should look to see how much you have to put towards savings that month.
Once you have allocated all of your savings, C19 should be zero. If it is a negative number, then you have money that you haven’t allocated yet. If the number is positive, you have over allocated somewhere.
Other Areas
On the right side bar, the spreadsheet also contains an area for you to write down upcoming events or expenses so that you can remember those things in the coming months when you are budgeting.
There is also an annual bill tracker in the middle of the right side bar so that you can better keep track of them, and create your sinking funds off of them.
Finally, in the purple box at the bottom center of the spreadsheet there is an account balance summary. This section is optional, but I like having a brief overview of what is actually in each account. I think seeing my entire financial profile is extremely important, so I wanted to give you the option to see yours too.
Monthly Reports Tab
At the end of each month, I like to copy the ending values for cells E15 – K15 and cells E18 – K18 and paste them into the report for that month. Just make sure that when you paste, you paste values only.
This allows me to see how much I spend in the year in particular categories. It also allows me to compare how well I did month to month.
I hope these instructions make sense. There are also instructions built into the spreadsheet. Any cell that you see a red spot in the top right corner of the cell has a comment of instructions for your to read if you need it. I recorded a video to walk you through the spreadsheet as well. You can watch it here:
IF YOU HAVE ANY QUESTIONS WHATSOEVER, DO NOT HESITATE TO EMAIL ME! I will do my best to get back to you in a timely manner.
info@addiedwyer.com

